Convert TIFF to PNG – Trying to Change TIFF to PNG? Look Here


Even though TIFF & PNG images are almost the same, users feel the need to convert TIFF to PNG. Why is it like that?
Users having TIFF files may want to convert them to a more accessible file format if they want to send them to multiple users.
Because it is difficult to send multiple TIFF files, people find themselves in trouble a lot of times. PNG format has a wider range of users & systems.
TIFF format is a Tagged Image File Format which provides an excellent images quality. These files can’t store any links or unseen data & are ideal for storing records, etc.
However, users change TIFF to PNG because of its compatibility strengths. The Portable Network Graphic file is a raster image capable for constructing graphics piece-by-piece.
It has a lossless compression that allows images to be shrunk to a smaller size with no loss of image-quality. The image can also be reverted to its original size without losing the resolution.
With the help of PNG format, users do not have to worry about their images being sent & losing quality even in bulk.
But converting images in bulk is a difficult procedure.
Check out the methods for conversion.
Guide to Convert TIFF to PNG Provides Two Simple Methods
The two different methods to convert the images are:
The first method is a free solution to convert the images but there is no possibility to change the format for bulk images. If you can handle converting images separately and going through the process repeatedly, you can try this method.
With the help of the second method, it is easier to convert the images in bulk and allow yourself a less complicated operation.
Let’s check these out one-by-one.
Steps to Change TIFF to PNG Using the Manual Method
We will be conducting this operation with the help of the Microsoft Paint application. Following are the steps:
1. Launch your MS Paint application on the desktop.
2. From the toolbar, open the menu by clicking on the File tab.
3. Choose the Open button and select the image you want to change.
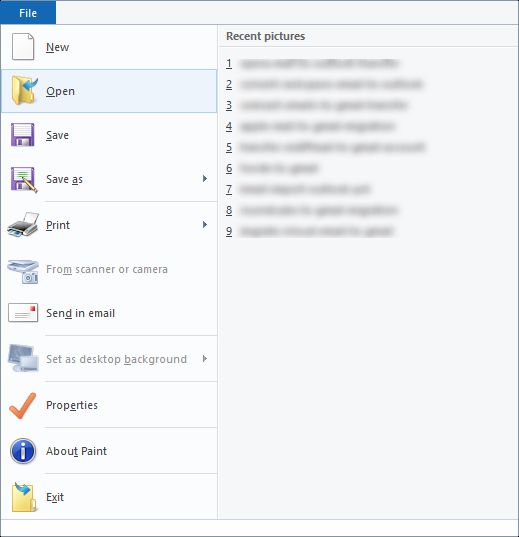
4. Hit the Open option to display the images in the application.

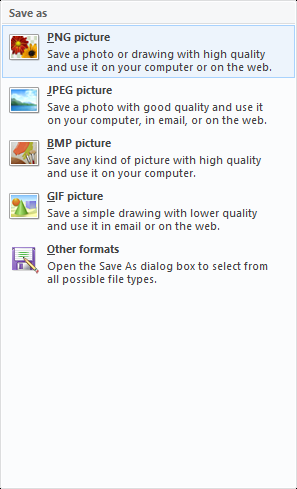
5. Click on File again & choose the Save as Select the PNG format.
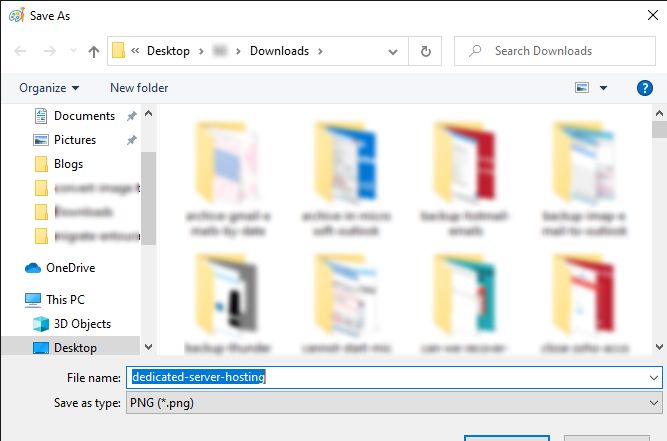
6. Change the name of the image and click on Save.
This will convert TIFF to PNG but by taking a lot of time. It doesn’t allow users to change multiple images.
Let’s take a look at other limitations that the manual method has.
Does the Manual Method Bring Any Complications Along?
There are certain downfalls of using the free technique a few of which are stated below:
- Using the manual method, it is not possible to turn the images to another format in bulk. It requires you to perform the procedure every time you want to convert them.
- With this technique to change TIFF to PNG, you might lose the quality of the images during the conversion.
- Because of the repetitive steps, users find it difficult to convert the right images & not have any duplicate items.
- Not feasible for urgent purposes.
- The process becomes cumbersome due to the lengthiness and time taken by the manual solution.
- This technique may also cause loss of images-quality or an entire image due to the complications of the repetitive steps.
It is possible to overcome the complications of the manual method.
Convert TIFF to PNG File Via Expert-Recommended Technique
The best solution for converting images in bulk is the Image Converter Tool also useful for all non-techies.
![]()
If you need to convert images in bulk, you can either insert multiple files or folder(s) containing images.
The software will help you with conversion without incurring loss of image-quality or any image for that matter of fact.
With the features of the tool, it is possible to shape the procedure as per your accordance.
Let’s first checkout the steps of conversion.
Instructions to Change TIFF to PNG With the Software
1. Run the software & enter the images for conversion using the Add File(s) or Add Folder(s) option.

2. Press the Change button to set the destination location for your images after conversion.

3. Select the PNG option from the Export Formats section.

4. Choose the option to change the size of the images by marking the Resize Image Then, choose the size in Set Width & Set Height sections.

5. For completing the process, click on the Convert button.

Now, take a look at the features of the software to convert TIFF to PNG.
Functions for Changing the Format of Images in Bulk With No Losses
- It doesn’t cause any changes in the quality of the images during conversion.
- There is the possibility to convert the files in bulk via Add File(s) or Folder(s)
- Option to convert images to different file formats like PDF, HTML, BMP, etc.
- With this tool, users can change the size of their images via Resize Image
- This tool has the ability to keep the structure of the folder maintained
- Users can also save the images in the desired destination location quickly
Final Observation
The manual method to convert TIFF to PNG is a useful solution only if there are only 3-4 images for conversion. If users want to change multiple images or in bulk, this method is not what you need in urgency.
Available software in the blog is the only technique allowing users to change the images in bulk. If you want to save the files with no losses, this tool is your best option. Since conversion is a difficult process, it needs a simple yet secure technique.