Authenticate SSO Configuration In Linux – Single Sign-On Technology


To handle user authentication across different systems, networks, and applications is the most time-consuming tasks. Hybrid cloud computing environment makes it more challenging and increased the complexity of network security. Moreover, Single sign-on (SSO) technology provides a large variety of solutions which make the user management and authentication simple across multiple systems. Here, in this blog, we are going to discuss the process to authenticate SSO configuration in Linux in an efficient manner.
Have a Quick Glance on SSO Solution
SSO (Single Sign-On) is a session-based authentication process that enables a user to provide all types of credentials to access various applications. Moreover, the process authenticates a user for each application they can get all rights to and eliminates further pop up when they switch more applications during a session. Now we will discuss for SSO configuration in Linux platform.
SSO Configuration In Linux Platform
There are so many SSO solutions developed over a period of years, from MIT Kerberos server to Microsoft Active Directory. With increasing a Web-based application, additional different SSO solutions have become more popular. For an instance, any website that permits to sign-in using your Facebook profile or Twitter account is utilizing the SSO-based protocol solution, like OAuth.
For business applications, an industry has developed the XML-based standard known as Security Assertion Markup Language (SAML). It is capable enough to distribute authentication data and authorized information to facilitate single sign-on (SSO). In this blog, we will discuss Shibboleth and SimpleSAMLphp, these two SAML options present for adding SSO to a cloud-hosted application. Know all technical terms before doing SSO configuration in Linux procedure.
Know About SAML & SSO Terms
There are many terms that want to be understood to have a firm grasp of both SAML and SSO systems. These terms can be used by SAML specification along with this SSO configuration in Linux platform.
- An Identity Provider (IdP) is just a service that authenticates a user and offers them all security tokens. The IdP saves a database of end users and offers secure authentication mechanisms. This will allow the IdP to check all credentials and assert its knowledge of authentication.
- The Service Provider (SP) is just a system provides service to users, such as web or email server. This SP checks with an IdP to verify user security token.
- A Principal is also the thing that can be authenticated. Generally, the principal is a user.
How SAML Authentication Works
Before understanding what elements of SAML-based SSO need to deploy, first, you have to know about the typical SAML session. The below process outlines what a web application flow looks like while using SAML SSO. Let us have a look:
- A user attempts to reach web-based application at the service provider.
- A service provider creates SAML request and redirects a user to IdP’s SSO URL with the help of this generated request.
- The IdP that can authenticate a user and creates a SAML response.
- A user can easily redirect back to the SP with the help of SAML response.
- The SP authentication verifies a SAML response.
- The user has successfully logged-in to an SP web application service.
Note: The IdP can use any backend as soon as it provides the SAML response. It means that authentication data information can be saved in LDAP, Active Directory, or the arbitrary database. This describes that a SAML SSO is built on top of an existing authentication system (s). For SSO configuration in Linux, you must follow all steps carefully.
Are You Deploying the Identity Provider (IDP) Discovery service or SP?
In hybrid cloud configurations, an IdP can reside on the private network in secure segments, usually inside an enterprise. This configuration requires many web applications in the cloud might include service providers. However, many times when you need to deploy the IdP. For an instance, if you will provide an SSO solution that can be used by external clients or services outside of your enterprise system, it only makes sense to deploy the IdP to a cloud host safe and secure.
Shibboleth Service Provider (SP)
Shibboleth must contain these two packages i.e., SP and IdP. The Shibboleth Service Provider integrates with an Apache HTTPD and capable to work with some SAML implementations. Shibboleth SP on the virtual server can integrate a wide variety of mail applications and will be used to authenticate against the enterprise IdP security.
Install & Configure Service Provider Software
- Navigate to the server in Control Portal. Now, your IP address will be renowned on the screen.
- From a shell script on the local system, you connect to a new server with the following command. You can Replace “YOUR.VPS.IP” with a server public IP address.
![]()
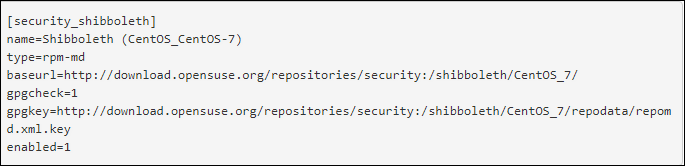
- To configure yum repository you need to know about Shibboleth software repository. With the help of a text editor, generate /etc/yum.repos.d/shibo.repo and then, edit it to look like this:
- Now, the yum repository has been configured, run the below commands to install and run Shibboleth SP.

In order to make SP production ready, you should configure the Apache HTTPD with some additional information about an enterprise. All items are specific to each application configuration. Thus, when we cannot provide you additional steps, kindly note the following information:
- Be sure that your configuration enables this option UseCanonicalName and set the ServerName to the given value given by your enterprise configuration services.
- It is mandatory that your SP running over a secured connection. Thus, make sure that SSL is enabled and you have a security certificate, and configuration that matches your entire enterprise needs.
Setting Up Shibboleth SP
The configuration of Shibboleth SP is located in /etc/shibboleth/shibboleth2.xml. Your enterprise offers all configuration parameters for the IdP. Most prominent changes you will be located in the section you labeled “ApplicationDefaults” of configuration files.
SimpleSAMLphp Service Provider
The SimpleSAMLphp library is a scalable, well-known SAML authentication platform that can easily be deployed. As compared to Shibboleth, it seems very simple and feature-light. It is an effective and efficient solution for integrating the federated, enterprise-grade authentication into the PHP application.
Service Provider Software Installation
- In the Control Panel, go to the server. Your public IP address will be noticed on the screen
- From a shell script on your local system, connect to the new server with the following script
Replace “YOUR.VPS.IP” with the server’s public IP address.
![]()
- Installing the prerequisite software by running these commands.
![]()
- Now, you can download the latest edition of SimpleSAMLphp from a download page and then, unpack tarball

- Move an extraction directory to your installation path. We can use this /var directory.
![]()
Configure Apache Server for SimpleSAMLphp
Using Shibboleth SP configuration, this can vary according to your needs and environment as well. The following points that cover a basic SSO configuration in Linux:
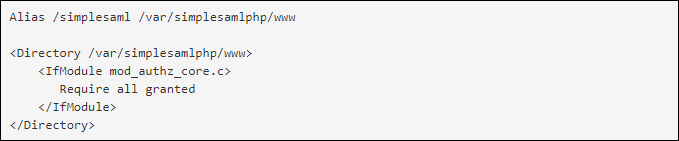
- With the help of a text editor, you can create a particular file and edit it like this:
- Using the text editor, open this link: /var/simplesamlphp/config/config.php. Go through this file and then, configure it to match the SAML SSO and enterprise needs.
- Next, you can start a web server with the following command line:
![]()
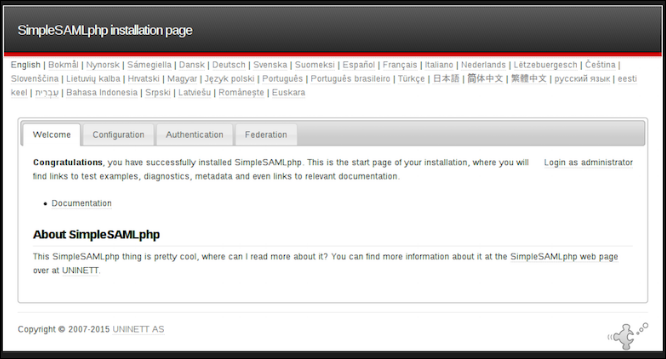
- Check the SimpleSAMLphp configuration by using the following URL in your Web browser:
With the help of Shibboleth SP configuration, make sure that you can deploy SSL support for the Apache HTTPD and need you to double check the configuration against that enterprise requirements.
Moreover, CloudCodes solution provides a cross-network and certain services. This service allows a user to access their mobile phone, cloud, and on-premises programs on any device. When implementing SSO, users just need to enter the username and password for once and acquire access to any device and application depending upon policy from an enterprise. It gives a support to external as well as internal users. It also helps to increase the productivity by keeping your data safe and secure. Now easily do SSO configuration in Linux with this CASB solution.