How to Block USB Ports in Windows With Effective Solutions?


We all share our devices for work-related purposes with other people. While working on the system, there are high chances that the current user has injected some malicious viruses. However, it can be done intentionally or unintentionally. So, to prevent such situations and protect your important data, it is necessary to keep the USB ports locked. Therefore, today we will learn how to block USB ports in Windows 11, 10, 8, and 7. To learn about it, stick to this article until the end. Here, you will learn different tactics to prevent an outsider from connecting to a USB device.
User Query: Hey, I am a chartered accountant, so it’s my primary duty to protect the data. I need to share the device with some other users. To prevent any connections to my USB storage device, I am looking for a professional program. I have tried to do so manually, but there is only an option to disable it. I need to disable USB ports in Windows 8. Can anyone please suggest a good and trusted reference?
Quick Steps to Block or Disable USB Ports
- Download the software on a Windows machine.
- Enter the email ID and password to get the OTP.
- Paste the OTP and click Verify.
- Then, verify it by clicking OK.
- Now, hit the Block Tab to lock USB ports.
Methods to Block USB Ports in Windows?
Let’s dive into each method for blocking the USB ports in the next section.
Disable USB Port in Windows Using Registry Editor
There are ways that you can manually disable the USB ports. One of the methods is the Registry Editor. To use it, follow the below steps carefully:
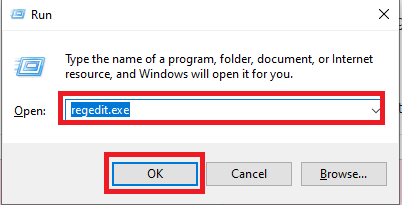
- First of all, either open the Run dialog box or press Windows + R keys
- Secondly, here, type regidit.exe and tap on the OK button to proceed
- By doing so, the Registry Editor dialog box appears.
- Here, follow the below path
Computer > HKEY_LOCAL_MACHINE > SYSTEM > CurrentControlSet > Services > USBSTOR - Now, in this step, tap on the Start button from the given options
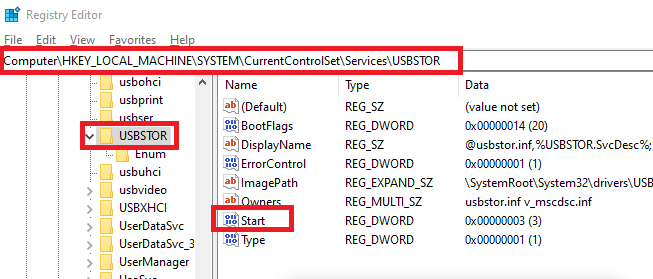
- An Edit DWORD (32-bit) Value wizard will pop up. To disable the USB, change the value from 3 to 4 and tap the OK button
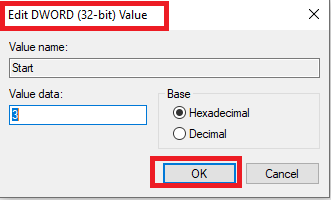
Note: You can again change the value to 3 to enable the USB port in Windows.
- To finish the process, restart the PC to make changes.
Using Device Manager
Along with the above manual method, you can try the Device Manager approach. Using this, you can easily block USB storage devices. To do so, follow the guidelines mentioned below:
- To open the Device Manager box, either type Device Manager after clicking on the Start button. Or just press Windows + X keys and tap on the Device Manager option
- Now, from the Device Manager dialog box, choose the Universal Serial Bus Controllers option. It will prompt with different device options
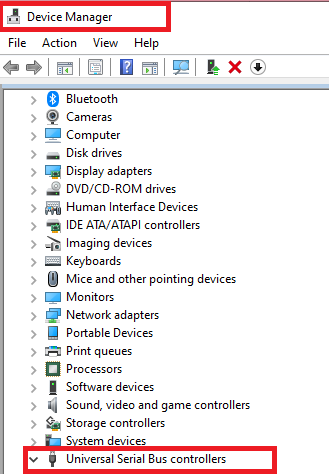
- Then, to block, right-click on any given device, and choose Disable Device option.

You’re done with both manual tricks.
Limitations of Both Approaches
- There are certain drawbacks to manual methods when you try to block USB storage devices 10, 8, and 7.
- Both options just allow you to disable the particular device.
- However, it never allows you to block them with passwords. With such limitations, anyone can easily enable the USB ports at any time. Eventually, there will be a lot of issues with protecting your data.
There is no security, so any user can easily interrupt your crucial data.
Automatic Way to Block USB Ports in Windows 11, 10, 8, 7
What if someone enables them again and injects your device with the virus? Or take some crucial information? The worrying situation, no? But, no worries, we have an alternative solution for this situation. You can protect your information as well as block it completely. For that, just use the USB Port Blocker Software. This is automated software tested by the top technical professionals. It will help you lock the USB devices with passwords.
So, no one can change the settings and hamper your data. This is a tool with advanced technologies that can recover lost passwords. Moreover, it is available for all the Windows OS versions, so you can lock USB drives 7, 8, and 10 easily.
Along with these, it will maintain the data security of your system. Eventually, through this, you can simply restrict any external excess.
Read More: How to Get Back Formatted Data from USB?
Steps to Disable USB Ports in Windows 11, 10, and 8
- First, download and run the USB flash drive utility. Now enter a valid email address to request the OTP (one-time password).

- Enter or paste the OTP received to your email address.

- Enter or paste the OTP received to your email address. Then click the “Validate” button.
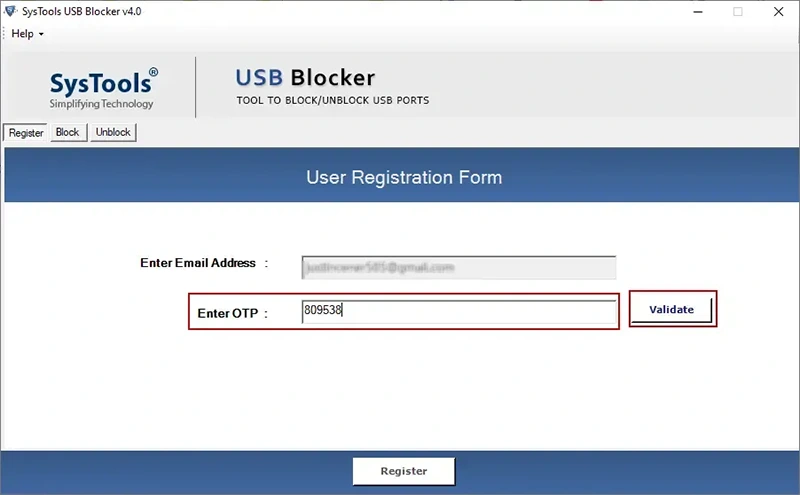
- After verifying the OTP, a pop-up window will appear, indicating that the email address has been verified.
- You will need to create a master password later. So enter your master password and enter it again to confirm.

- After setting the main password, a pop-up message successfully tells you that the user’s registration was successful.

- Now click the “Block” button to block the USB port on your computer.

- In the other window, type your admin password (user system password) and the master password you created during registration.

- After blocking a USB port, a pop-up will appear indicating that the USB port is blocked.
Also Blog: How to Recover Shift Deleted Files from USB?
Conclusion
Due to different scenarios, it is better to block USB ports in Windows 11, 10, 8, and 7 OS. So, for that, we have shared multiple methods in this article. You can use the manual methods, though, but they will only allow you to disable USB ports in Windows. So, to overcome its limitations, we have shared an automated method. This will allow you to lock USB storage devices with passwords. So, use the appropriate method and protect your computer data.