Migrate Exchange 2010 Mailbox to Office 365 Step By Step | Complete Solution


Nowadays cloud services are incredibly increasing and highly in demand. The supporters of the cloud are increasing day by day and many IT companies or organizations and other industry verticals also started using Office 365 because the Microsoft Exchange Server tends to be complex and requires technical experts to handle or operate it. That’s why users are using O365 instead of Exchange Server. This write-up will guide users and provide a solution to migrate Exchange 2010 mailbox to Office 365 step by step by using a hybrid migration solution.
Users are moving their Exchange 2010 mailboxes because now Microsoft has end the support of Exchange Server 2010 on October 13th, 2020 the other reason is that the cost server and the hardware part (heating, backup, cooling, RAID, server, disk, etc…) are expensive. The licensing, securing like – SSL certificate, maintenance, and updation is higher the MS Office 365.
In O365, users can buy as many licenses as they want. It is flexible, users can scale up or down the Office 365 service any time from anywhere. Because of all these outstanding qualities users can search for a solution where they can move mailboxes from Exchange 2010 to Office 365.
Moreover, users can use the hybrid deployment solution provides users to migrate on-premise Exchange 2010 database mailboxes or vice-versa. While moving the mailboxes users need to use the migration batches to run the remote mailbox move request. It helps them to move the existing Exchange database mailboxes rather than creating new ones and importing the user information.
Note: You have to config the hybrid deployment between the Exchange on-premise & Exchange online to migrate the Exchange database mailboxes.
Things to Know Before Migrate Exchange 2010 Mailbox to Office 365 Step by Step
- It will take approximately 10 min to configure the migration batch and the total time to finish the migration depends on the number of Exchange mailboxes added in every batch.
- Before starting the migration users have to assign some permission. Turn on the Move Mailbox and Migration Permission which is the alternative to the recipient permission.
- This solution is configured between Exchange on-premises & Exchange Online
Rapid Solution: If you are new to the Microsoft Exchange environment it would be very difficult for you to perform migration because it needs technical skills, in-depth knowledge, and hands-on experience to use the manual solution. So, in order to avoid all these technicalities and complexity you can use the Exchange to Office 365 Migration tool which easily migrates on-premises Exchange 2019 / 2016 / 2013 / 2010 mailboxes to Office 365 in a simplified manner without any hassle.
Simple Steps to Migrate Exchange 2010 Mailbox to Office 365
Step 1. Download, install, and run the software on your computer from the below button.
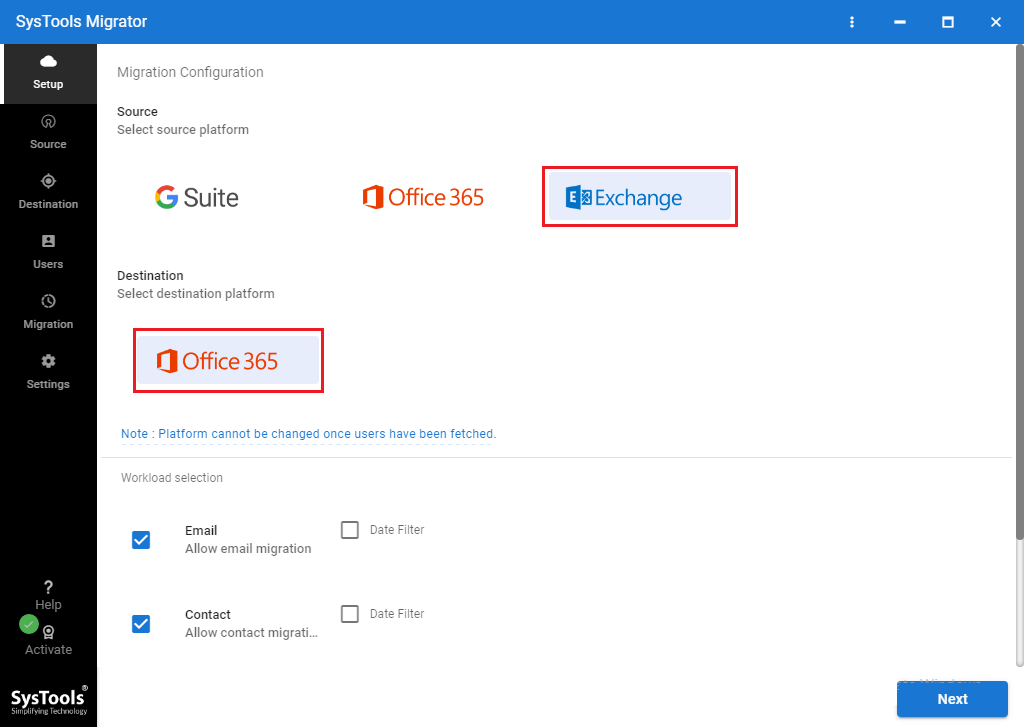
Step 2. Choose Exchange as the source and Office 365 as the destination migration platforms respectively.
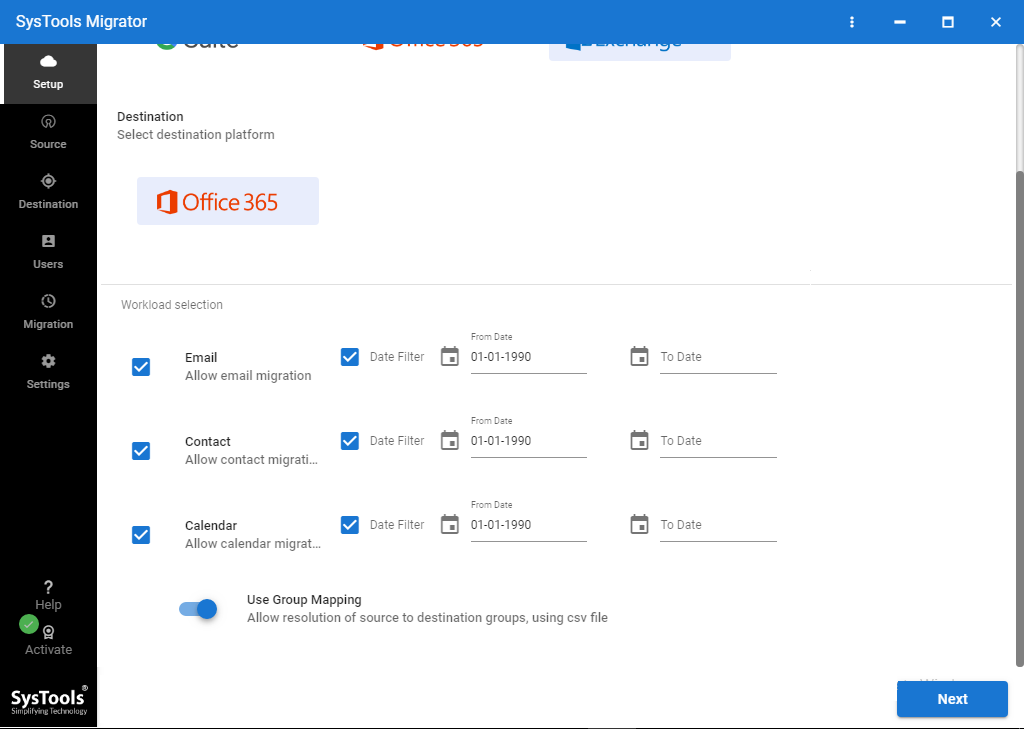
Step 3. From Workload Section, choose the required mailbox items such as Emails, Contacts, and Calendars to migrate from Exchange 2010 to Office 365. Use the Date Filter feature to migrate data selectively.
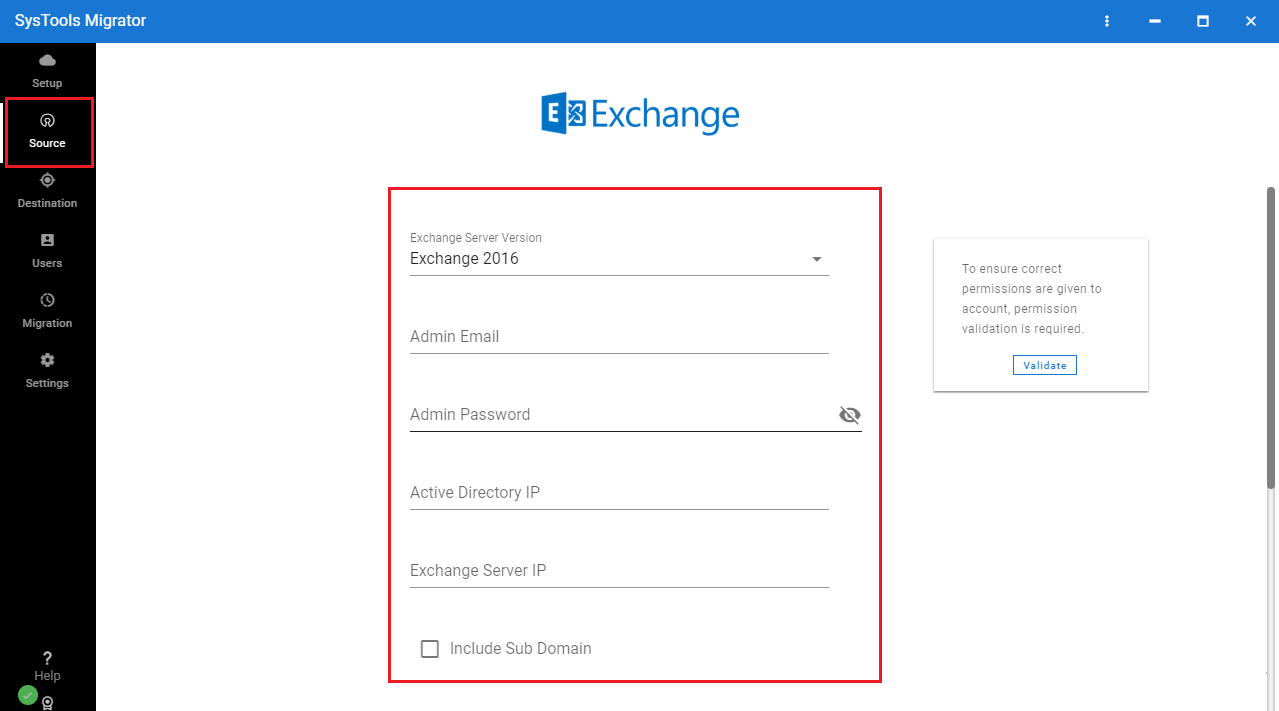
Step 4. In the Source tab, select the Exchange version, in our case select Exchange 2010 and provide the other required details. Validate required permissions and click on Next.
Step 5. In the Destination Tab, use your Office 365 Admin account credentials to log into the software. Validate required permissions and click on Next.
Step 6. From the Users Tab, use any of the three options such as Fetch Users, Import Users, or Download Template to Fetch source users. Create source and destination user mapping. Validate required permissions and click on Next.
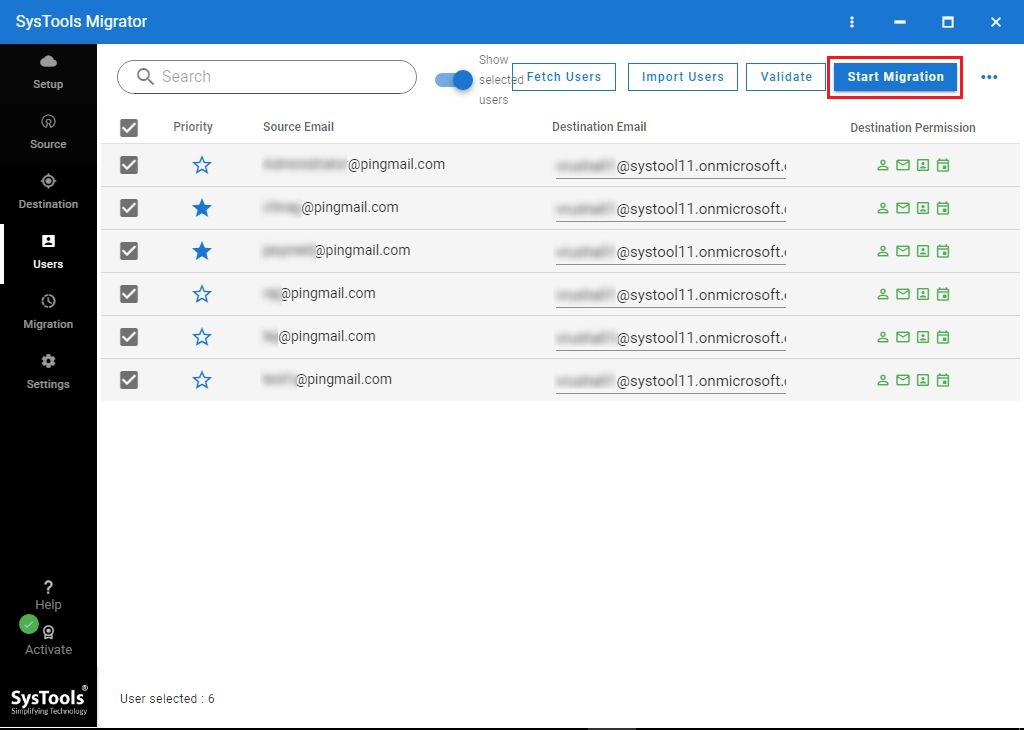
Step 7. After successful Permission Validation, click on the Start Migration button.
Migrate Exchange 2010 Mailbox to Office 365 Step by Step Via Hybrid Migration
Step 1. Generate Migration Endpoint
It is suggested to generate the Exchange remote migration endpoints before executing the on-boarding & off-boarding of the remote Exchange mailbox migration in this solution. The on-premise connection settings comprise in migration endpoint, that runs the Mailbox Replication Proxy Service which is crucial for remote migration.
Step 2. Turn on Mailbox Replication Proxy Service
This service needs to be available on-premise Exchange CAS (Client Access Server)
- Start Exchange Admin Center >> Navigate to Servers >> Click on virtual directories
- Select CAS (Client Access Server) >> Click on EWS Virtual directory
- Click on the edit button >> Check the Mailbox Replication Proxy Service enabled option
- Click save button
Step 3. Use Exchange Admin Center to Migrate Exchange 2010 Mailbox to Office 365
- Launch EAC >> Go to O365
- Select Recipients >> Click on Migration >> Select the Add button
- Then, select migrate from Exchange online
- Select User wizard >> Click on the Next button
- Click on + button >> Select the Exchange Online >> Click Next button
- After that, verify the Migration endpoint wizard >> Ensure that the FQDN of Exchange is listed there >> Select the Next button
- Go to the configuration window >> Insert the migration bath name in the text field of the new migration batch name
- Then, put the target delivery domain in the target delivery domain for mailboxes >> Navigate to start the batch page
- Select the recipient to get the entire batch report
- Also, ensure that the Automatically start button must be selected
- Finally, automatically mark the complete migration batch
Step 4. Remove Full Migration Batches
After the migration of Exchange 2010 mailboxes to Office 365 processes are successfully completed, then users have to eliminate the migration batches. Doing this lowers the chances of errors that will occur in multiple states where the same users moved again.
- Start Exchange Admin Center >> Go to Office 365
- Click on the recipients >> then, migration >> Select the completed migration batch
- Then click the Delete button >> It will show the confirmation wizard >> Select the yes button
Step 5. Re-enable Offline Outlook Web App Access
Users can access the Exchange database mailbox in OWA when it is in offline mode. When the users want to perform migration then they need to reset the setting of the Outlook Web App in the browser so that they can access the mailbox via OWA when it is not connected to the network.
Drawbacks of Manual Solution for Migrating Exchange 2010 to Office 365
- Complex and Time-taking method
- Require technical expertise to use this solution
Note: If users Exchange database mailboxes are corrupted/damaged or their Exchange database is in offline mode then they cannot use this method to move their mailbox from Exchange 2010 to Office 365. In that case, it is suggested to use the advanced solution i.e. Exchange Server EDB Recovery Tool that easily recover EDB file from corruption & export the mailbox from the offline Exchange database to Office 365 in a simplified way without any hassle. As it provides a graphical interface that makes the user’s work easier and saves their time and effort too.
Bringing It All Together
Now users can easily migrate Exchange 2010 mailbox to Office 365 step by step via hybrid migration. However, if you find the solution complex and prolonged then it is recommended to use the automated wizard described in this article. In case you have an offline/dismounted EDB file that is corrupted then users can use the solution described above which easily recover & repair Exchange mailboxes 2007, 2010, 2013, and 2016 along with Exchange database files.
Moreover, it can also migrate the recovered mailboxes to the O365, or if you want to perform on-premise migration in a hassle-free way that you can use the solution mentioned in the beginning which easily performs migration of on-premise Exchange Server 2007, 2010, 2013, and 2016 mailboxes to Office 365. According to your necessities and choice, you can select the option to move mailboxes.