Upload PST to Office 365 Webmail using the Best Way


Nowadays, there is a high demand for a reliable solution to upload PST to Office 365 webmail, due to growing business demands for migration over the cloud. The problem arises for Office 365 users when they want to perform this task manually. It is the large size of the Outlook data file that may lead to corruption. Users can either configure an OWA account in MS Outlook or use an application to import their Outlook PST file into O365 webmail.
This blog comprises of explanation of both these procedures. One can choose any one of the illustrated measures depending upon their reliability factor. Even you can also go with an automated tool like Office 365 Import which will help user to execute this technical task without any data loss.
Solutions to Upload PST Files to Office 365 Webmail
There are two ways that we can use to perform this task, one is through manual and automated solutions. Find the best solutions to import Outlook PST files into O365 Online from the below-discussed methods:
Solution 1: Configure Office 365 Account in MS Outlook
The method works with the recent 3 versions of Microsoft Outlook i.e., 2019, 2016, and 2013. Users can utilize this email client for moving emails, address book content, and calendar mailboxes into their O365 account.
Steps to Upload PST Files to Office 365 Webmail using Outlook
The following steps will help in practically implementing the solution:
- Open your MS Outlook application
- Goto File and click on Add account. Enter the Office 365 details & let the program sync with all the content present in O365.
- Now export PST file from MS Outlook (default Outlook account), which is to be uploaded in O365. This step is needed if the source .pst is not orphaned.
- Once done with Step (3), go to File >> Open & Export >> Import/Export.
- An Import-export window gets opened in which you have to choose Import from another program or file option. After this, click on Next.
- Among the 2 displayed option, click Outlook Data File (.pst) >> Next.
- Continue with the procedure to upload PST to Office 365 online by clicking on Browse.
- Navigate the location where the .pst file is saved, select it, and hit on Open.
- Now click on Next and select the Office 365 id in the “Import items into the same folder in” field.
- At last, hit on Finish to begin the process of Upload PST files to Office 365 webmail.
Matthew Hardwick Asks on Microsoft Forum– “I have a few PST files that I need to upload into Office 365 users account. A few days ago somebody suggests me to use the Outlook configuration method for importing the PST file. But the problem is I have to upload these PST files to multiple accounts. As the configuration time of Office 365 account with Outlook is too much, I cannot wait that long to upload PST files. Please, provide any other quick solution.”
Solution 2: Direct Way to Upload PST to Office 365 Online
If the uploading procedure is carried away by hand then, this can be performed. The manual way is simple and easy for a small amount of data but, when it comes to large quantities, the same thing changes the data status at a risky state.
To carry away things without realizing any difficulty, users can opt for the mentioned tool. The solution clears all the difficulties that were faced at the time of upload PST to Office 365 account. Users can first understand the attractive characteristics of this measure and then, discover the simple workings of the same.
Must Read: How to Move Files from OneDrive to OneDrive for Business – Complete Guide
Features That Help in Uploading PST to Microsoft Office 365:
- Enables users to import multiple Outlook PST files into the O365 admin or user account
- Supports migration of emails, contacts, calendars, and tasks from PST file
- A unique feature of incremental import from the same PST after an initial attempt
- Creates a new folder in the O365 account where imported Outlook items can be seen
- Easily import Outlook PST files into Office 365 shared mailboxes via Admin account.
- Import PST file of any type to Office 365 account using this tool
- Data filtering option to move selective mailboxes or data from PST to O365
Simple and Easy Steps to Upload PST to Office 365 Webmail
1. Download and install the setup file of the above-mentioned tool.
2. Double-click on the desktop icon of the software for its launch.
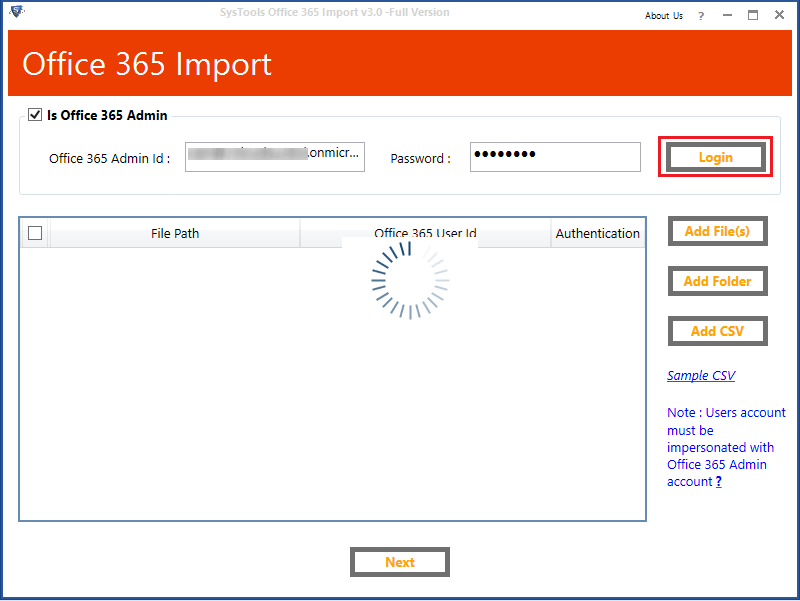
3. You will find a login window where you have to enter the O365 username and password. Click on Login to start importing PST files into Office 365 account.
Note: If the credentials are of administrator then, you have to check the checkbox of Is Office 365 admin. This will log all users to the admin Exchange online account.
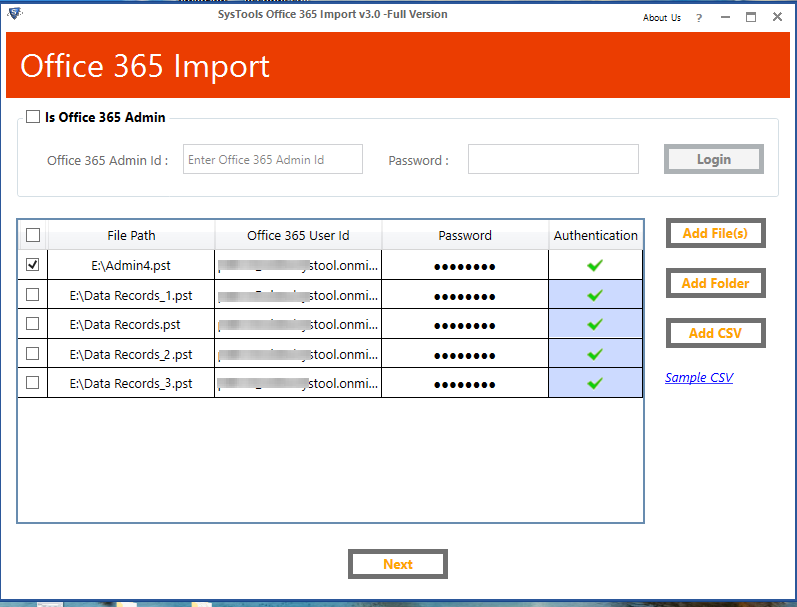
4. Click on Add File or Add Folder option to browse one or more PST files into O365, respectively. If the administrator is not impersonated then, you can add the user id and password for each user. Click Next.
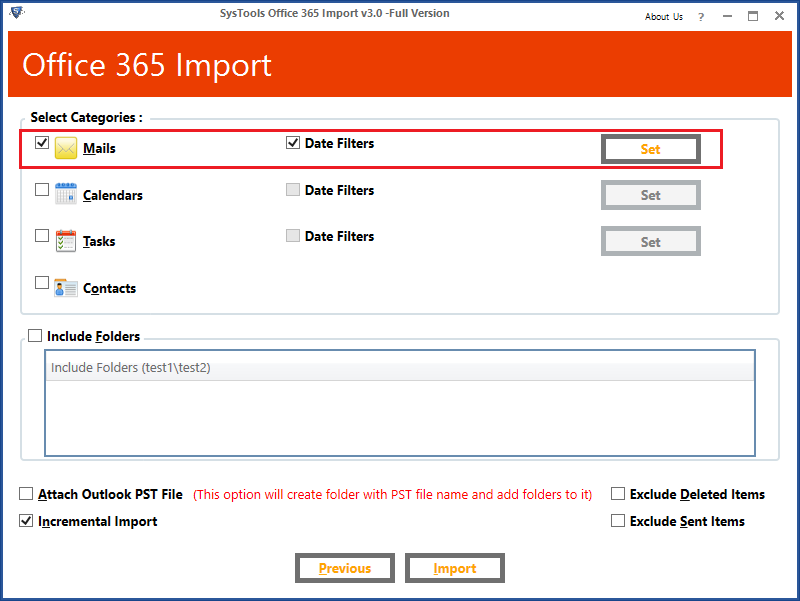
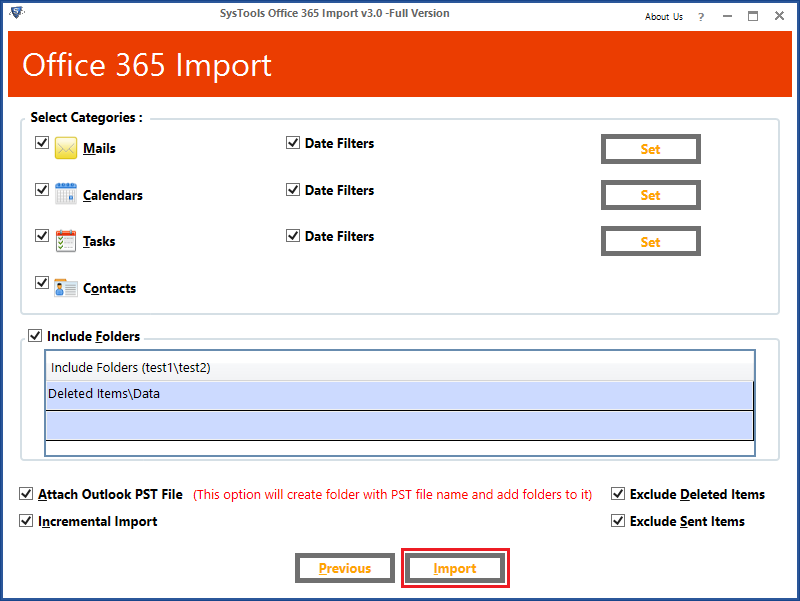
5. Now, Choose the Category of data you want to import from the PST file and Apply the Date filter for each selected category for selective data import.
6. If required then, use advance setting options that are provided to you on the current panel; else go with default settings and click on the Import button.
7. Finally, the main procedure gets started in which the tool starts with the migration of PST items in the Office 365 profile.
Also Read: How to Migrate Mail from One Office 365 Account to Another? Stepwise Solution
Conclusion
The post familiarizes users with procedures to upload PST to Office 365 Webmail profile. It takes no time when users follow the above-mentioned approach instead of the manual way.
This is so because the measure is directed by aiming for an immediate way to import Outlook PST files into Office 365 accounts. One of the best things about this software is that it does not essentially require Microsoft Outlook to be present on the source machine.